Monday, 10 October 2011

10 steps to make your eyes look bigger! =)

Hey everyone =) So I thought I'd share with you a few tips on how to make your eyes look bigger, all of these are pretty simple, but can make a big difference! These are in order =)


1) Keep your eybrows in shape! - Its amazing what a difference your eyebrows can make. It completely changes how you look, and if your eyebrows are nicely shaped, it will lift up your eyes and make them look more defined.

2) Don't apply dark colour eyeshadows all over the lid- This will close up your eyes and give the impression of them receding inwards.

3) If you're going to use dark colours, keep them very close to the top lashline, and not really much on the bottom. This will open up your eyes and make them look bigger.

4) Use a good lengthening mascara. You want your lashes to have the pefect balance between volume and length. You want them to be long to open out your eyes, but also to be volumised to create the illusion that they are bigger.

5) Curl your lashes. This also (like said before) will open out your eyelashes and make them look not so closed off.

6) If you want, apply a little bit of gel or pencil liner to the OUTER parts of your eye, eg in the outer top lashline, and outer inner lashline. I also find that just putting it on the outer top lashline looks really pretty. If you go all the way in it will make your eyes look smaller.

7) Use bright colours on the inner half of your eye - Those like silver and gold will brighten up your eye using the shimmer.

8) Conceal your eyes well. - Hide blueness and dark circles with a salmon-toned concealer, the orangey tones will conteract the blueness and hide them better, this makes your eyes look brigther and more awake!

9) Use a small bit of white eyeliner in you waterlines if you want, this will again make your eyes look bigger, brighter and more awake! (this doesnt work quite so well on brown eyes as it can look alittle harsh, but try it out and see what works for you)

10) use a small bit of white eyeshadow (it can be shimmery) on the VERY inner part of your eye, near the tearduct. This makes SUCH an amazing differences it's unbelieveable. Also you can do the same to your browbone to brighten up you eyes.  the NYX jumbo Eye Pencil in Milk is perfect for this.

Recommended Products! =)
Urban Decay Skyscraper Multi- Benefit Mascara. This adds AMAZING length, you can leave it natural build more coats to add volume.
NYX Jumbo Eye Pencil in Milk. I use this nearly everday to highlight my inner eye near the tearduct.
Sleek Ink Pot gel eyeliner in Dominatrix works really well along the top lashline and is easy to apply.

Remember that not nessecarily EVERY single one of these tips will help everyone, but at least some of them will work for people depending on the size, shape and colour of your eyes, they're all easy and worth trying out to see what works well for you!
Thanks for reading! =) x

Thursday, 6 October 2011

My new favourite eyeliner! Stila Smudge Stick in Peacock review

Hey everyone! I have now found my NEW FAVOURITE EYELINER EVER!! =)

So i was wandering around Boots when completely by accident I stumbled across a Stila counter- which has never been there before! Stila is very hard to get ahold of in the UK, so I was THRILLED when I found out that Boots had started stocking it because i had been dying to try out some of their products! The thing I wanted the most was one of their eyeliners, particular one Marlena from MakeupGeek had featured in one of her videos: the Stila Smudge Stick Waterproof Eye Liner in Peacock.

All of their products come in nice little brown card boxes, I VERY nearly bought a prime pot, but I had to limit myself to one item because i had a few things to get and i have this weird thing where i hate going a couple of pounds over and having to break a new note..(yeah a bit OCD i know...) so I tried out the tester for this and LOVED it. I just couldnt resist. I also had a lovely chat with one of the workers, i think she was almost as exited as i was. Nearly.


Isnt it pretty. One thing I dont like about it is that its one of those twist-up pencils which i find break easier, but im prepared to let that go after seeing the colur and how well it stays on. When they say waterproof, they mean it. This will last ALL day on me, even in really hot weather. It still looks as great at the end of the day as it did when i first put it on in the morning. Also i like that the colour of the pencil itself is actually the colour of the liner...i have bought several liners thinking that they would be the same colour as the packagng..how wrong i was.

Its the most amazing teal colour with little sparkles, its actually a little ligher than as its showing up on the picture, but th lighting was funny. also please excuse the word "art" written all over my hand..its the only way to get my to remeber to do art homework. =P
The price is steep. £13. I know it seems like a lot but i think it's worth it, I think I will get a lot of use out of this and the colour looks realy nice with my blue eyes. I know the weight of my purse will pay for it but i do plan on buying more Stila in the future, I was really impressed with this.

Hope you enjoyed my review! There will definitely be more Stila reviews soon, I can see this brand becoming one of my favourites now its easily found... =)

Wednesday, 5 October 2011

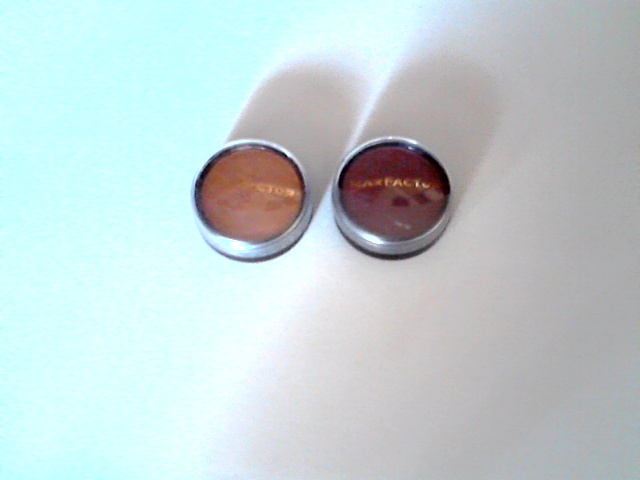
Review: Max Factor Eyeshadows in Inca Bronze and Passionate Plum

Hey everyone! =) here is my review for a couple of Max Factor eyeshadows I got a while back. The first one is in Inca Bronze and the second in Passionate Plum. Inca Bronze is a medium gold colour and Passionte Plum a deep...well Plum colour! They are both shimmery, but Inca Bronze is more shimmery, Passionate Plum has a  few paler purple sparkles in it.
I can't actualy remeber how much these were and I can tseem to track them down on the Boots website (where I got them) but I think they were around £5. You can buy Max Factor pretty much everywhere, Boots, Superdrug, Tescos, Sainsburys ect.

In all honesty, these arent the best eyeshadows I've ever tried. I bought them around christmas time (I told you it was a while ago!) because there was one of those "Spend a certain amount of money and we'll give you free stuff" deals on, and i tend to gravitate towards those deals. I chose these two eyeshadows and a concealer because at the time I hadnt tried out much Max Factor Makeup. These shadows are...ok. I like the colours, and the pigmnetation isnt BAD but not good either. They are quite hard in texture and it takes a lot of building up to get a good colour. They also fade quite easily, and the Passionate Plum faded to a kind of grey/mauve colour on me after a while.  Inca Bronze was definitely the more pigmented of the two.

The photo is terrible, but the pigmentation really isnt amazing. I prefer the Inca Bronze colour to the Passionate Plum, it's just prettier, but both you need a primer with and they both are quite hard, so you need to pack them on. I havent bought any other max factor eyeshadows since, they werent by far the worst eyeshadows I've tried, they just werent good enough for me to consider buying again! I still use them from time to time.

Hope you enjoyed my review! Thanks for reading =) x

Tuesday, 4 October 2011

Review: Barry M Supersoft Eye Pencils VS NYX Jumbo Eye Pencils

Hey! I thought I'd do a review on the Barry M Supersoft Eye Pencils, and compare them to the NYX Jumbo Eye Pencils! =)


I have two of the colours:
No 1:  A Matte Black
No 5: A shimmery lilac

These are kinda the English equivalent to the NYX Jumbo Eye Pencils, seeing as I have both, I can make a few comparisons to the two products! You can buy Barry M in Boots and Superdrug, it's not that hard to find! I think these were £2.99each, I'm not 100% sure how much the NYX ones are but I'm pretty sure they are less that $5 each. So in price, the twoarent that different really.


Both shades of the Barry M pencils are very well pigmented, and as the name suggests, soft.They are crayon-ey (?) in texture  but not at all waxy...in comparison to the NYX ones they are less creamy, the NYX ones are VERY creamy and  easily smudged, which could make it harder for them to last all day, so if you have a problem with that then I think  the Barry M ones would last slightly longer. I NEED to set the NYX ones with powder, otherwise they get all over my eyelid, but setting the barry M ones isnt crucial because they arent as creamy. In that way, I kind of prefer the Barry M ones because you don't have to set them and they arent as messy. The NYX ones are bolder, and more pigmented though, but if you DID set the Barry M ones with powder I think they turn out pretty much the same as the NYX ones.

The lavender shade is slightly less pigmented, and also is slightly less creamy than the black pencil, its slightly more metalic in finish. These pencils smudge, but without making a huge mess like the NYX ones have a tendency to do if you're  doing it in a rush.

All in all, if you couldnt get a hold of the NYX Jumbo Eye Pencils, these Barry M ones would be a very good duplicate. I do love the NYX ones, but I use them for slightly different things. The NYX ones are great for using as a base, and  are REALLY creamy and bold and pigmented and very useful and versitile, the Barry M ones are easier to get (if you're in the UK obviously) and create more of a smokey look, they are slightly easier to use and (I think) are slightly cheaper. Both have quite a good range of colours, but I think the Barry M ones have more shades because they also have glitter shades, as well as mattes and shimmers. I think NYX do have lots of shades but I dont THINK as much as Barry M.

Two very good products, I'm very glad to have both of them as I use them for different things! =)
Hope you enjoyed my review! =) x

Sunday, 11 September 2011

Eye Tutorial: 5 Minute Easy Teal Winged Liner

Hey everyone! Here is a tutorial - I was going to film it but I didn't have time in the end and it seemed silly to take off my makeup and then redo it... =)

This is a really easy winged teal liner, I saw Marlena from MakeupGeek do a similar look and it looked amazing, so I wanted to do one with less expensive products, and products that are easier to get in the UK! =)
First apply this all over the lid, you can get this at the E.L.F website, (www.eyeslipsface.com)


Then you just want to sweep a colour similar to your skin tone, I prefer it to be a shimmery one but you could use matte if you want. I just use a little palette I got from Claires because it has a shade thats perfect for my skin tone!


My favourite black eyeliner! I use this to line the top and bottom water lines. I wil be doing a review on this liner soon, it has been my go-to liner for ages now! =)

I love this liner! I will be buying more of these I think! This is the perfect teal colour I think! Use this to line the top lashline, and also bring it out to a little flick at the outside. Like this:

(This is the finished look, yours won't look quite like this at this point! This is just to give you an idea of the shape)

I luckily found this Dazzle Dust in the EXACT shade of the Accessorise pencil! =) Take an angled liner brush and use it to pack it on top of the liner to set it and make the colour more intense. (I find the best way to apply these Dazzle Dusts is to take a little bit on the brush, then tap it into the lid, then pick up the pigment from the lid, this stops you picking up too much!)
Then finish off with this masacra! I like that this gives really full, thick lashes.

And thats it! It's really quick and easy but I think really pretty. You could aways swap the colours of the liner around, purple would look nice or a bronze colour.
Hope you enjoyed this tutorial inspired by Marlenas look! =P
xx

Saturday, 10 September 2011

Review: Sleek Ink Pot Eyeliner Gel (Black)

Hey everyone! I'm going to do a review for the Sleek Ink Pot Eyeliner Gel, the only colour I have is in "Dominatrix" but according to other people there are other colours available. I've only ever seen the black shade though. This cost me about £4.50 or something near that, definitely under a fiver, it was more than the £4.30 that is shown on the website. I bought this in Superdrug which as far as I know is the only shop that stocks Sleek, but you can also get it online at: http://www.sleekmakeup.com/en/products/ink-pot-dominatrix-336.aspx

It comes in a pretty little glass jar with pink writing on it, it's a screw top. I like the glass jars as the liner doesn't dry out as fast. The liner itself is a very dark bold black, but it's not the deepest black I've seen. It goes on quite smoothly. On the website it says it is waterproof...I'm not sure I would say its completely water proof, maybe water resistant..but it certainly lasts a long time. I've been wearing it to school recently on my upper lashline and it's lasted very well all day on me. The colour at the end of the day is almost as bold as it was when I first applied it. I have swatched it before and then washed my hand and it stayed on a bit so I think in the rain you would be safe with this, just as long as it wasnt too heavy rain or it might smudge a bit!

As you can see it comes with a TINY little brush. I mean really small. Its quite fiddly to use, and slips out your hand a bit but it's not so bad that you can't apply the liner with it. but I would definitely recommend buying a seperate longer liner brush to use it with, it gives a better more defined look. But I do sometimes (when I'm feeling lazy) use the litttle brush.

Basicaly for the price this is a great liner to have. As usual from sleek its pigmented and longlasting, and thats amazing to find for under a fiver. The only critisim really is the tiny fiddly brush, but it's still a nice touch and if you didnt have another liner brush is still (for me at least) perfectly useable.
Hope you enjoyed my review! xx

Friday, 9 September 2011

Review: E.L.F Natural Radiance Blusher in Shy

Hey everyone! This is a review for the E.L.F Natural Radiance Blusher in Shy. You can get this for about £1.50 on the elf website. (www.eyeslipsface.com)


I tried to do a swatch of this but it wouldnt show up so there was little point. Its basicaly a natural, doll kind of pink, its quite bright if you put loads on, but it gives "Natural Radiance" when you just apply lightly, this colour I think would work best for people with fair skin, because it gives a lovely flushed glow, and its got a tiny amout of sparkle in but not enough that it will show up too much. I wear this to school (which is pretty strict on makeup) and no one even notices I'm wearing it. I only wear a bit at a time and I wear it most days, I havent even worn away a dip in it yet! I think this will last me a long time.

I'm not going to lie, for me its quite hard in texture, so it's not the easiest to apply because you don't end up with much on your brush! It's also not incredible pigmented, but for me thats sort of a blessing in disguise really. I havent tried any other colours so far, but I'm tempted because I love the price. I dont LOVE the product, but I like having it and I get quite a lot of use out of it. If you're just starting out using blushes it would be great as they're small and cheap.


I'm not too thrilled about the packaging, its got a slidey lid, which has broken several times, and whilst its easy to fix, it is annoying. It's not amazingly sturdy, but I wouldnt worry too much about putting it in my bag. The size is a tad annoying if you had a  bigger blush brush because I doubt it would fit in the pan, and thats if you could get enough product on it because as I said before its quite hard. I use it to give more of a natural flush to stop making my face look flat and one colour.

Thanks for reading my review! As I said, it's not the best product, but certainly not the worst. You can't really expect too much for the price anyway really! x